
Raster Data Optimization
The following section explains how to improve the GeoServer performances with the optimization of raster files. Basic optimizations have been already been discussed in the Introduction To Processing With GDAL sections, describing the most common techniques used.
Checklist for WMS and WCS serving
The objectives for the optimizations to be performed on raster data are listed here geared towards essentially two objectives:
- Fast extraction of a subset of the data, which usually involves re-tiling and compression.
- Fast extraction at any resolution, which usually involves adding overviews or creating reduced resolution version of the original data.
By experience there is a number of things to take into account for achieving such objectives:
- Avoid having to open a large number of files per request.
- Avoid parsing of complex structures and slow compressions.
- You’ll have to get familiar with the eventual bottlenecks in your infrastructure: CPU vs. Disk Access, Time vs. Memory.
- You’ll have to experiment with format, compression, different color models, tile size, overviews, GeoServer configuration.
About Raster Data Formats
It is important to become familiar with the different specifics of the various input formats. Be aware that some issues might be software specific but most are format dependant. Find a list of formats that should raise a flag when you are willing to perform high performance serving with GeoServer below.
PNG/JPEG direct serving (as data sources)
A few hints:
- Bad formats to be used as input (especially in Java).
- No tiling (or rarely supported).
- Chew a lot of memory and CPU for decompression.
- Mitigate with external overviews.
It is a common use case to receive aerial imagery as a large number of jpeg compressed imagery. Well, I would refrain from the impulse of serving this as a simple mosaic since it simply won’t work as soon as you zoom out a little.
Any input ASCII format (GML grid, ASCII grid)
Well, it’s usually bad to serve from formats which are not binary as, no surprise, reading from disk is usually the most important bottleneck, as such if you use a text format (e.g. ascii grid) the size on disk of a small (in pixel terms) dataset is much bigger than binary formats. In addition tiling is usually absent, compression is difficult to achieve in a way that would not kill reading portions of the data, etc. etc.
Generally speaking, avoid serving data using native formats which are textual unless you really know what you are doing.
JPEG2000
JPEG200 is a format which is extensible and rich, but not (always) fast. We have a quite extensive experience with it and we can safely states that it can be difficult to tune it for performance as it might require specific encoding options. The point is that if someone has encoded a JPEG2000 file for maximum compression and/or streaming it is almost impossible to get high performance in direct serving out of it unless you spend billions on an high-end decoder that does a lot of caching.
Others
The usual ones.
- MrSID usually decently fast needs tuning during compression
- ECW usually pretty fast, beware of the licensing issues!
GeoTiff for the win
Our experience in serving raster data points in one direction: GeoTiff is a swiss knife (so you don’t want to cut a tree with it!). A few remarks about this format.
- Tremendously flexible, good for most (if not all) use cases
- BigTiff pushes the GeoTiff limits farther, but beware of the limitation of extremely large BigTiffs
As a rule of thumb use individual GeoTiff when:
Overviews and Tiling stay within 4GB (hint: compression can help to push this limit much farther)
No additional dimensions (TIME, ELEVATION,...)
Consider BigTiff for large files (> 4 GB)
Exploit the support for inner tiling
Exploit the support for internal overviews
Can be inefficient with very large files + small tiling
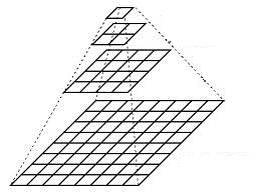
GeoTiff with inner overviews and tiling
Proper GeoTiff Preparation
Here below the basic steps for properly preprocessing a GeoTiff file are presented; notice that these are not GeoServer specific but can be applied to other servers as well.
- Perform a
gdalinfoand spend time in understanding the characteristics of your data as well as how you want to serve them - (Optional) Use
gdal_warpto transform the data in the most used output reference system (mind, any reprojection ruins the data a bit hence beware of the interpolation scheme you are going to use) - Use
gdal_translateto add inner tiling and fix eventual issues with coordinate reference system - Add compression options if you disks are small/slow/not local (consider JPEG compression with YCBCR color interpretation for photos, LZW/Deflate for scientific data)
- Use
gdaladdoto add internal overviews (remember to replicate compression here)
About tile size
There is no mathematical rule to decide the tile size for inner tiling. Let us dig a little deeper on this subject. A GeoTiff can contain multiple pages/images, each page/image starts with what is called the image directory which contains various info about the current page; in such directory we have 2 arrays of integers (for bigtiff are long) which contains the location on the disk of the tile and its size in bytes.
Splitting the file in proper tiles is important to minimize the amount of data we read/write on each requests, the number of read operations (i.e. seeks and load) and the amount of storage we might waste when the file size is not a valid multiple of the tile size on both side. If the tiles are too small, for large tiles the page directory might explode and become slow to scan for the Tiff reader, on the other side a tile that is too big will make the directory small and fast but might end up in too much data to read for most operations.
The default for GDAL is 256x256 but it is not unusual for us to set this to 512x512 on large bigtiff files. Smaller tiles are usually problematic as the TIFF directory size might explode, larger tile size can be useful together with JPEG compression and very large files since we might loose some CPU cycle but reduce the impact of slow storage/large files.
Deciding when to go beyond and use mosaicking plugins
As long as the size of the dataset (again, beware that proper compression can help greatly to reduce the size of the disk) is reasonable (by experience below 20 to 30 GB) with respect to the disks speed we can use individual geotiff for our datasets without problems. Notice that this means that if you received a mosaic of a large number of small files we are implicitly suggesting that the best option you have is to merge them into a single, larger, properly preprocessed file (and gdal_merge or gdalbuildvrt is your friend for this first step).
If an individual GeoTiff is not enough or if for any other reason you need to retain individual files then the ImageMosaic plugin is the tool to use, in certain specific cases the ImagePyramid might get into play.
- As a rule of thumb we would suggest to use ImageMosaic when:
A single file gets too big therefore slow when accessing (inefficient seeks, too much metadata to read, etc.). This depends greatly on the speed of data access (local disk, NAS, etc.) it is hard to given a number but experience says 20 to 30 GB.
Data has multiple Dimensions (time, elevation, others..)
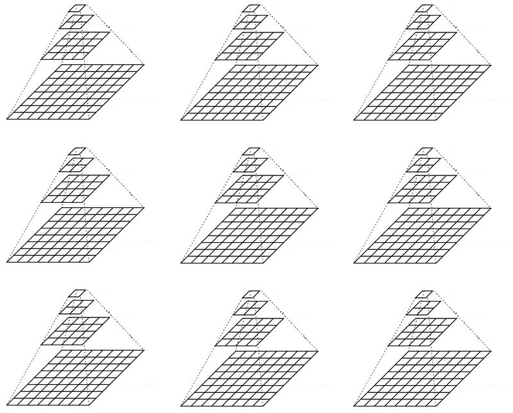
Mosaic of geotiff files
- When you use the ImageMosaic, you are asking GeoServer to compose a raster on the fly from the individual granules to answer a request. To retain performance we need to make sure that each possible request does not require GeoServer to open too many files but also that each file is properly preprocessed. This means that:
- ImageMosaic works best if we never open more than 32 to 64 files for request (take special for request at global scale). Use exclusion rules in your styles to avoid problems.
- Single granules can be large, so no problems in having a mosaic of large BigTiff files. We have configured mosaics made of BigTiff of 100GB each (with a clever usage of styling exclusion rules)
- Use Tiling + Overviews + Compression on granules, they are individual GeoTiff in the end.
In specific cases we have used the ImagePyramid (or a LayerGroup if multiple ImageMosaics with proper scale exclusions in the styles). This usually happens when
We have a tremendously large dataset (e.g. 1TB or more )
Made by too many files / too large files
Which we need to serve at all scales
Especially at low resolution / global scale
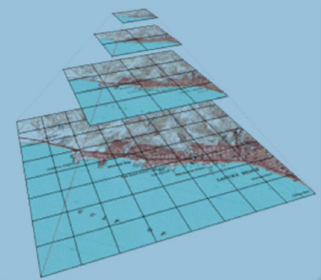
Pyramid of geotiff files
In this case gdal_retile can be your friend although usually more complex workflow need to be set up to reduce creation time.
Special care needs to be taken with respect to the number of files that we are going to generate:
- Having too many files inside a single directory can be problematic for some file systems, therefore you might want to use multiple directories even for individual resolution levels.
- Individual files in each level of the pyramid do not need to be small. It is legit to build multiple mosaics of largish files to reduce the impact of small files on the file system
Note
Regardless of using ImageMosaic or ImagePyramid, particular care is needed with respect to the chosen layout according to eventual requirements in terms of data updates, addition or reprocessing. Depending on the chosen layout reprocessing or updates can be particularly difficult.
Note
Once you get familiar with the tools you can mix things up using multiple ImageMosaic together with a LayerGroup or an ImagePyramid with an odd layout of resolutions levels.
Additional Tweaks
Proper Mosaic Preparation
- If memory is scarce:
USE_JAI_IMAGREADto true, to activate reading in streamingUSE_MULTITHREADINGto false as multithreading is useless with streaming reads
- Otherwise
USE_JAI_IMAGREADto false, to activate immediate reading in memoryALLOW_MULTITHREADINGto true (Load data from different granules in parallel)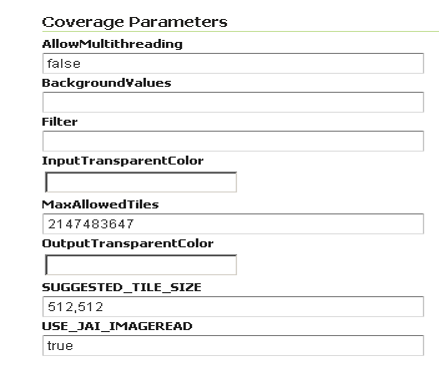
`ImageMosaic` panel detail
JAI Settings
Install the TurboJPEG extension
Give JAI enough memory but not too much!
Don’t raise JAI memory threshold!
JAI multithreading rule of thumb: use 2 times #Core Tile Threads (check “Coverage Settings” below)
Play with tile Recycling against your workflows (might help, might not, in most cases it does not help!)
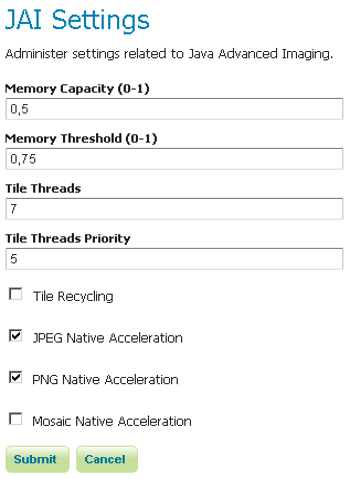
`JAI Settings` panel
Coverage Settings
Multithreaded Granule Loading
Allows to fine tuning multithreading for ImageMosaic
Orthogonal to JAI Tile Threads
Rule of Thumb: use 2 times #Core Tile Threads, perform testing to fine tune depending on layer configuration as well as on typical requests
ImageIO Cache threshold, decide when we switch to disk cache (very large WCS requests)
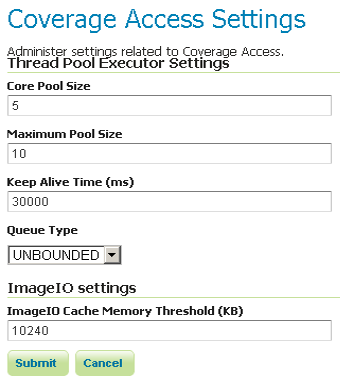
`Coverage Access` panel
Test the Unoptimized Mosaic
Note
This section requires the layers published in the Adding an Image Mosaic, Introduction To Processing With GDAL and Advanced Mosaics Configuration sections.
Go to
$TRAINING_ROOT/data/jmeter_data(%TRAINING_ROOT%\data\jmeter_dataon Windows ) and copy the filetemplate.jmxfile, creating amosaic.jmxfileFrom the training root, on the command line, run
jmeter.bat( orjmeter.shif you’re on Linux) to start JMeterOn the top left go to File –> Open and search for the new jmx file copied
Disable the Thread Groups 8, 16, 32, 64 by right-clicking on them and selecting Disable.
In the
CSV Data Set Config(under the Loop Controller) element of the remaining thread groups, modify the path of the CSV file by setting the path for the fileoptimized.csvin the$TRAINING_ROOT/data/jmeter_data( or%TRAINING_ROOT%\data\jmeter_data) directoryIn the HTTP Request Default element modify the following parameters:
Name Value layers geosolutions:boulder_bg srs EPSG:26913
At this point JMeter is configured to run a GeoServer performance test:
Run the test
Note
Remember to run and stop the test a few times for having stable results
You should see something like this:
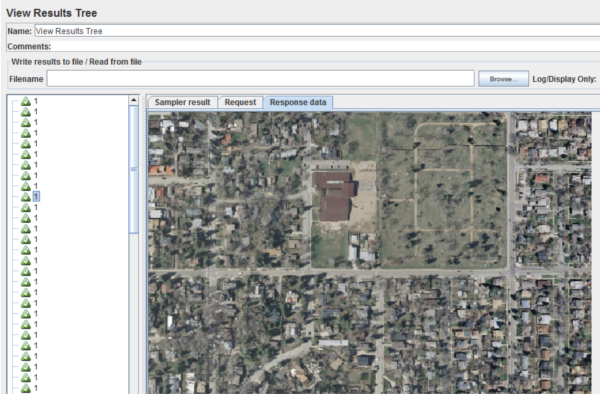
`View Results Tree` panel
When the test is completed, Save the results in a text file (e.g. with Save Table Data at the bottom of Summary Report)
Remove the results from JMeter by clicking on Run –> Clear All on the menu
Test the Optimized Mosaic
In the HTTP Request Default section modify the following parameter:
Name Value layers geosolutions:boulder_bg_optimized Run the test again
Compare the results of this test with the ones saved before. You should see that throughput is increased with the optimized mosaic.