
Geofence
GeoFence is an authentication/authorization engine for GeoServer that allows for more advanced security configurations than the default GeoServer one. GeoFence authorization rules can be based on multiple parameters, such as:
- The user requesting the data
- The user role.
- The source IP address of the web request.
- The OGC service and request being used.
- The requested layer or its workspace.
GeoFence can be run either as a standalone Java web application or embedded into GeoServer. The following sections refer to the embedded GeoFence even if the main concepts apply to the standalone GeoFence too.
GeoFence Admin GUI
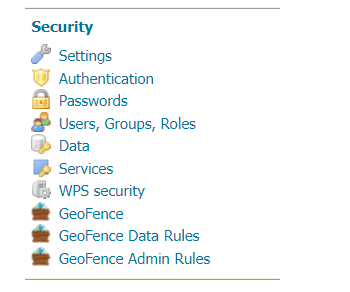
The GeoFence Admin Page is a component of the GeoServer web interface. You can access it from the GeoServer web interface by clicking the GeoFence link, found on the left side of the screen after logging in.
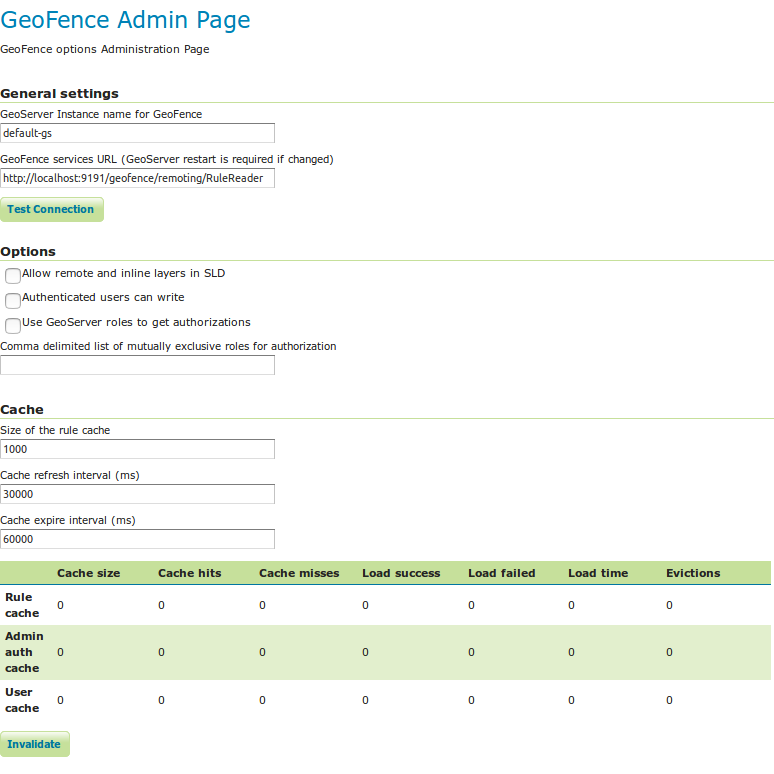
General Settings
Since we are running Geofence as a GeoServer internal server we don’t need to change anything in the General Settings. If we were running a standalone GeoFence, then the fields would have to be populated as follows:
- Geoserver instance name: the name under which this GeoServer is known by the GeoFence server. This useful for when you use an external geofence server with multiple GeoServer servers.
- GeoServer services URL: this is how geoserver knows how to connect to the external geofence server. For example “http://localhost:9191/geofence/remoting/RuleReader” for an external geofence server on localhost.
Options
The following settings can be configured here:
- Allow remote and SLD inline layers. If not checked exception will be thrown when remote and SLD inline layers are being requested.
- Authenticated users can write: allows write access to resources to authenticated users, if false only ADMINs have write access
- Use GeoServer roles to get authorizations: use authenticated users roles to match geofence rules, instead of username.
- Comma delimited list of mutually exclusive roles for authorization: list of mutually exclusive roles used for rule matching when Use GeoServer roles to get authorizations is checked.
Cache
The following settings can be configured here:
- Size of the rule cache (amount of entries).
- Cache refresh interval (ms).
- Cache expire interval (ms).
Collected data about the cache can be retrieved here. For each cache (rules, admin rules and users) GeoFence tracks the cache size, hits, misses, load successes, load failures, load times, and evictions. The cache can be manually invalidated (cleared).
Geofence rules
Authorizations rules are expressed as a priority-based rule set, in a similar way as iptables does.
Rules can be matched against user, caller’s IP address, name of OGC service, name of OGC request, workspace and layername (also agains user group and GeoServer instance with the standalone GeoFence version).
When a request is made to GeoServer, GeoServer sends an authorization query to GeoFence, which will indicate whether the requesting user can (or can’t) get access to the resource. Optionally it will also indicate constraints to be applied on the resource. Examples of constraints may be an allowed polygon that will apply a spatial filter on the requested data, or hiding a certain attribute from all the features from a given layer.
An ADMIN in GeoServer has access to everything; this means that, once authenticated as ADMIN, no further authorization requests will be made by GeoServer toward GeoFence. When editing users in the GeoFence GUI, the “is admin” checkbox makes the user a GeoServer administrator.
Rules overview
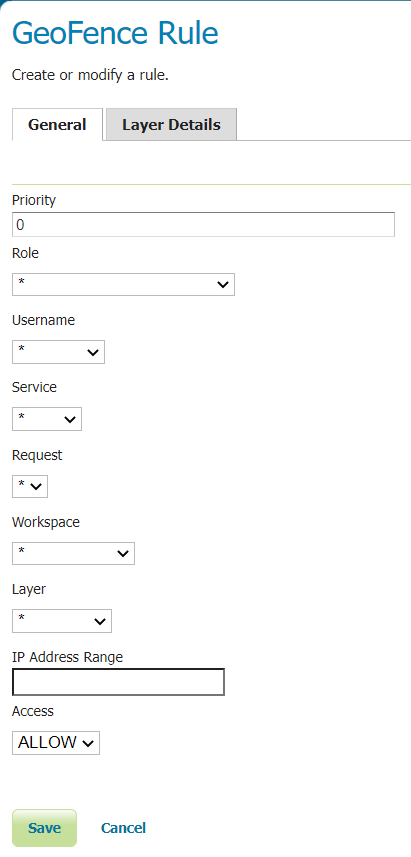
A rule is defined by a priority value, a filter, an action, and optional constraints.
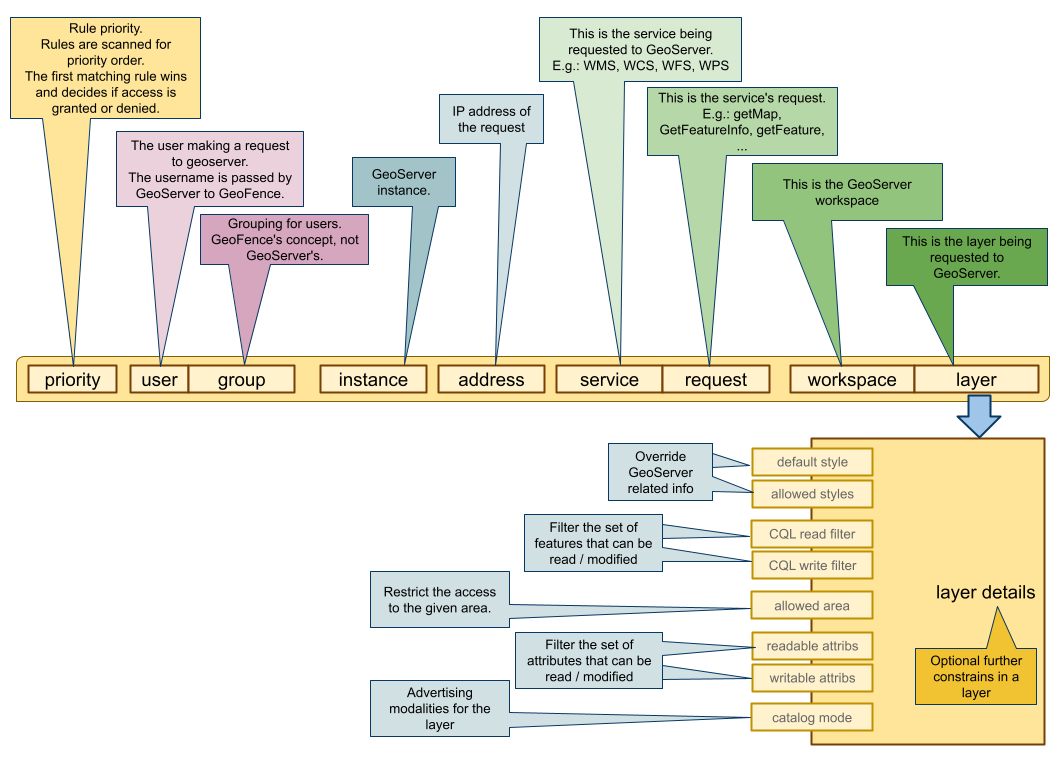
Priority
The priority is a positive integer number. When the filter selects the matching rules, the resulting rule list is sorted by priority. The lower the priority number, the highest the priority. The first matching rule is the one that “wins” and determines the final result, but note that GeoFence might perform merge operation among matched rules. The merge mechanism is detailed in the next sections.
Filter
When GeoServer asks for authorization, information about the current request, the user, and the resource being accessed is given to GeoFence.
Please note that any one of these fields may be not defined in a rule. In that case, the rule will match any value in the request. E.g. a GeoServer filter with user “John” will match any rule with “John” set as user, and any rule with no user set (usually shown as a “*” in the GUI, meaning that any user will match that rule)
user. The requesting user. In the GUI, you will choose a given user from a dropdown menu.group. The group the requesting user belongs to. In the GUI, you will choose a given group from a dropdown menu.address. The IP address a request is coming from. In the rule the administrator can specify an IPv4 address range in a CIDR notation (e.g. “10.10.0.0/16”). A rule will match only if the range in the rule includes the address in the filter.service. The OGC service for which the authorization request is queried. From a dropdown menu you can select one from the most common ones, otherwise you can type in any other string for customized services.request. The OGC request for which the authorization request is queried. From a dropdown menu you can select one from the most common ones, otherwise you can type in any other string for customized services.workspace. The workspace of the requested resource. A list of workspaces available in GeoServer will be shown in a dropdown menu.layer/layergroup. The requested layer or layergroup. A list of layer/layergroups is available in a dropdown menu.
Action
The Action specifies the outcome of the rule, if matched (by the filter) and selected (according to priority).
- ALLOW: merge all the LIMIT constraints and allow access to the resource. Allows to specify constraints on Layer details (see below).
- DENY: discard all the LIMIT constraints and deny access to the resource.
- LIMIT: add constraints to the final outcome. Constraints can be area constraints or catalog mode constraints.
Rule matching
When a user asks GeoServer for a resource, GeoServer will check if the user is authorized to operate on the resource.
GeoServer will then ask GeoFence for an authorization, specifying who made the request (e.g. the username of the user requesting the resource, the calling ip address), and what is the object of the request (the service – WMS, WFS, ..., the workspace involved, the layer).
- Read all the matching rules;
- Loop on the found rules in the priority order, and check:
- if the action type is LIMIT, collect the constraints in this rule and go on examining the next rules;
- if the action type is DENY, the request is not authorized;
- if the action type is ALLOW, the request is authorized; the collected limit constraints, if any, shall be merged and applied.
Constraints involving layers details can be added only in ALLOWing rules. LIMITing rules allows to specify Catalog Mode and Spatial filter only.
There are different kinds of constraints, and one ore more of them can be specified.
allowed area. An optional multipolygon constraints. It may be used wherever it applies: e.g.:getMaprequests will be cropped, and only the graphical part internal to the multipolygon will be drawn.getFeatureswill only return features that are internal or that intersect with the restriction multipolygon.attribute access. Only used in vector layers. For every attribute, the rule may assign the accessibility level: non accessible, read only, full read/write access.cql_filter_read, cql_filter_write. These two constraints define CQL filters to limit the set of features that can be read or written. These filters apply to vector layers, the read filter can also be applied to the index of a mosaic layer.available_styles. Restrict the list of the available styles for the layer filtered in the current rule. It may be useful to remove the styles that use one or more inaccessible attributes.default_style. Override the default style for the the layer filtered in the current rule.catalog mode. Sets the catalog mode for the layer defined in the selected rule. Note that the catalog mode behaviour could interact with the access mode, so you may have to set anEXCLUDEvalue in thecql_filter_read.
When a rule filter matches more then one rule for which LIMIT constraints have been set (i.e one ACCESS rule and more two or more LIMIT rules with defined ALLOWED AREA), GeoFence performs a constraints merging among rules in the most restrictive way:
- resulting allowed area will be the intersection of all the allowed areas;
- resulting catalog mode will be the most restrictive one (where HIDE is the most restrictive, followed in order by MIXED and CHALLENGE).
Groups and rules matching (Standalone version only)
The Geofence standalone version brings also the concept of group that is different from the GeoServer user group concept and is only used at GeoFence level to express authorization rules for a group of users at once. If a user belongs to more than one group, the rule evaluation with the limits merging is repeated for each group the user belongs to.
For each group, the final authorizations (the outcome explained in the previous section) will be computed and collected.
At the end, the authorizations in each group will merged in an additive way, so that the user will have all the privileges granted to each group the user belongs to.
It means that:
- resulting allowed area will be the union of all the allowed areas;
- resulting catalog mode will be the most permissive one among the ones present (where CHALLENGE is the most restrictive, followed in order by MIXED and HIDE).
GeoFence Admin Rules
A GeoFence Admin Rule has the same target as the admin mode of the default data access managements in GeoServer: it grants a role to access Workspace and contained Layer Configuration pages. It is possible to access the web interface by clicking the GeoFence Admin Rules link, found on the left side of the screen in the Security menu, after logging in.
A rule can be defined using the following fields:
user. The requesting user.role. The role of the requesting User.workspace. The workspace to which grant access.access. The access mode to the workspace:USERfor read access to the workspace,ADMINfor read and write access.
Tutorial
In this tutorial, we will set first a rule that will allow access to all the users to all the resources. Then we will start limiting the access with more specific rules, giving them a higher priority with respect to the first configured rule.
Setup
Stop the GeoServer instance by executing tomcat_stop_1.bat. Go to the data/plugins folder of your Training material package and extract the content of the geofence-server plugin zip. Copy the content to tomcat/instances/instance1/webapps/geoserver/WEB-INF/lib. Restart the GeoServer instance by clicking on tomcat_start_1.bat.
Once logged in as an admin, if the GeoFence internal server has been successfully installed, a couple of new links will be available under the Menu Security section.
Rule Configuration
If no rule has been defined the default behaviour is to deny the access to all the resources for non ADMIN users. Lets then start by defining a rule that will grant access to each resource to everyone. From the Welcome page click the GeoFence Data Rules link on the Menu Security section. An empty table will show up. Click on the Add new to configure a new rule and leave the default value in the form as they are. Click save.
With this rule we have granted access to all the users for every resource. Now logout from the Admin session and go to the Layer Preview page. All the layers are now available.
From the GeoFence Rules page click Add new rule in the top menu and enter the following configuration:
- Select
geosolutionsfromWorkspacecombo box. - Select
statesfromLayercombo box. - Select
ALLOWfromAccess modecombo box.
- Select
Now click on the Layer Details tab and enter the following configuration:
- Copy this WKT Polygon definition
SRID=4326;MULTIPOLYGON (((-112.43274999606744 48.44574625074907, -100.46939798520602 48.294311415168536, -100.46939798520602 46.93139789494382, 111.9027280715356 47.007115312734086, -112.43274999606744 48.44574625074907)))and paste it in the Allowed Area (WKT) text area. - From the Layer Attributes table, select the access to
READ_ONLYfor the following attributes:STATE_NAME,``the_geom``,``SUB_REGION``,``STATE_ABBR``,``LAND_KM``. - Click save.
- From the Layer Attributes table, select the access to
- Copy this WKT Polygon definition
Click again on Add new rule and enter the following configuration:
Select
ROLE_ANONYMOUSfrom theRolecombo box.- Select
geosolutionsfromWorkspacecombo box. - Select
statesfromLayercombo box. - Select
LIMITfromAccess modecombo box.
- Select
- Select
- Copy this WKT Polygon definition
SRID=4326;MULTIPOLYGON (((-103.57381211460677 48.90005075749064, -97.66785352696631 48.3700288329588, -97.44070127359552 43.75126634775281, -102.51376826554309 43.75126634775281, -103.57381211460677 48.90005075749064)))and paste it in the Allowed Area (WKT) text area. - Click save.
- Copy this WKT Polygon definition
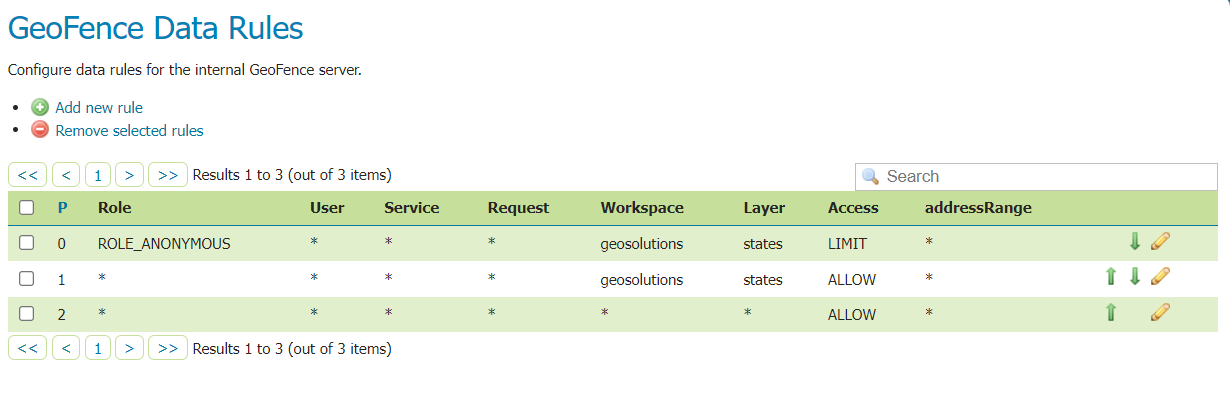
Your GeoFence rules page now should look as the following:
Note that we added two spatial filters that intersect each other and intersect the states layer as in the below image (where the black polygon is the first spatiaql filter we entered and the red one is the second):
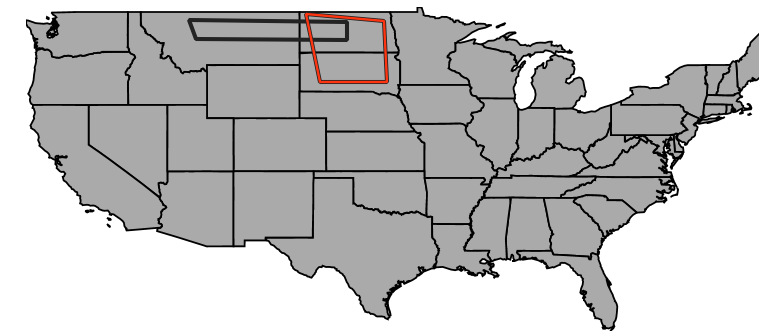
As per the rule evaluation process (detailed above), if an anonymous user will request the states layer, only the geometries captured by the intersection of the two areas will be displayed.
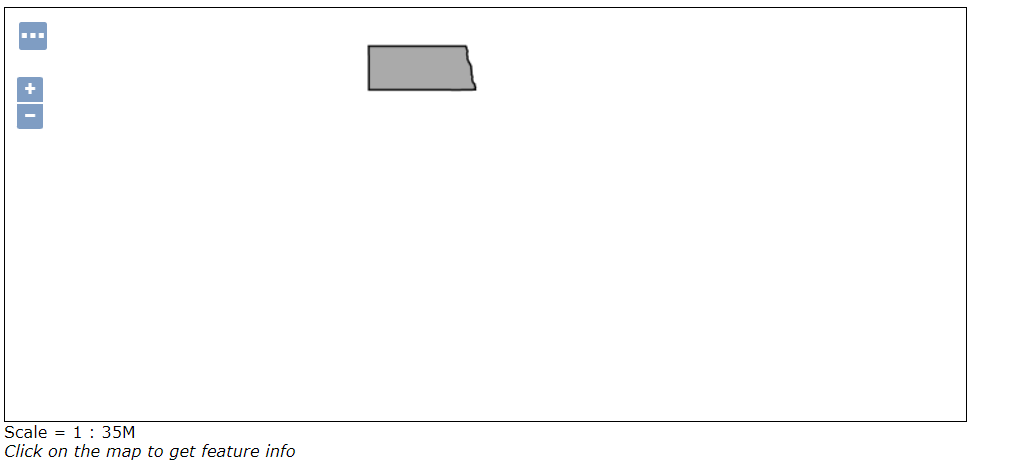
Now log out from the Admin session, go to the layer preview and preview the states layer with OpenLayers. The output should be the following:
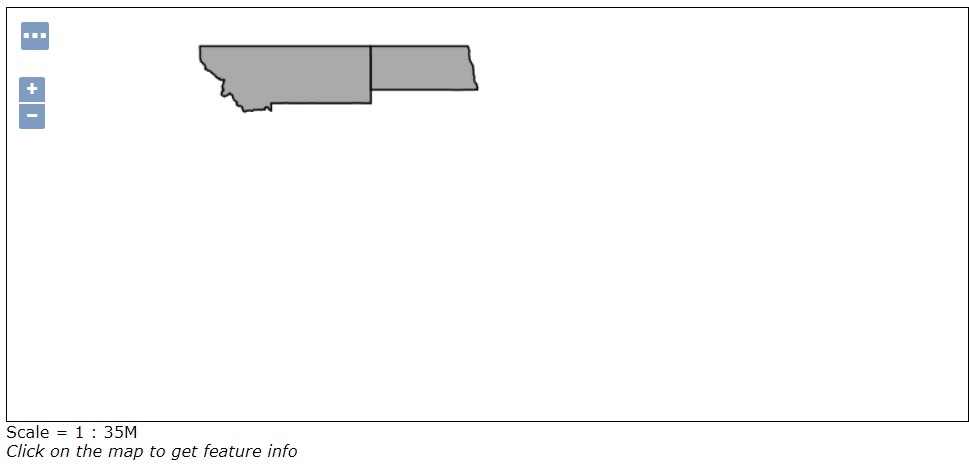
Now try to login as a non admin user (eg. using the test user created in the XML Users and Group Services training section) and perform and preview the states layer again with OpenLayers. The output should now be the following:
Click on one of the visible polygon to perform a GetFeatureInfo operation. Only the property selected to be READ_ONLY during the Rule configuration should be included in the output.
Now log-in as an ADMIN and go to the rules page and click to edit the Rule granting ACCESS to the
geosolutions:stateslayer. Click on the Layer Details Tab and enter the following configuration:- Select
states populationfrom the Default Style combo box. - Select
states populationas the only Selected Style in the Allowed Styles palette.
- Select
Log-in again as a non admin user, and preview with OpenLayers again the states layer.
- The layer should now be displayed with the newly defined default style.
- Try now to select the polygon style from the OpenLayers dropdown: an error message should be returned.
Admin Rule Configuration
- From the GeoFence Admin Rules page click Add new rule in the top menu and enter the following configuration:
- Select a non admin user name from the
usercombo box (eg. using the test user created in the XML Users and Group Services training section). - Select
geosolutionsfromWorkspacecombo box. - Select
ADMINfromaccesscombo box. - Click save.
- Select a non admin user name from the
Now logout and login as the non admin user referenced by the admin rule. It will now be possible to access and modify the geosolutions workspace configuration and the layers contained in it.