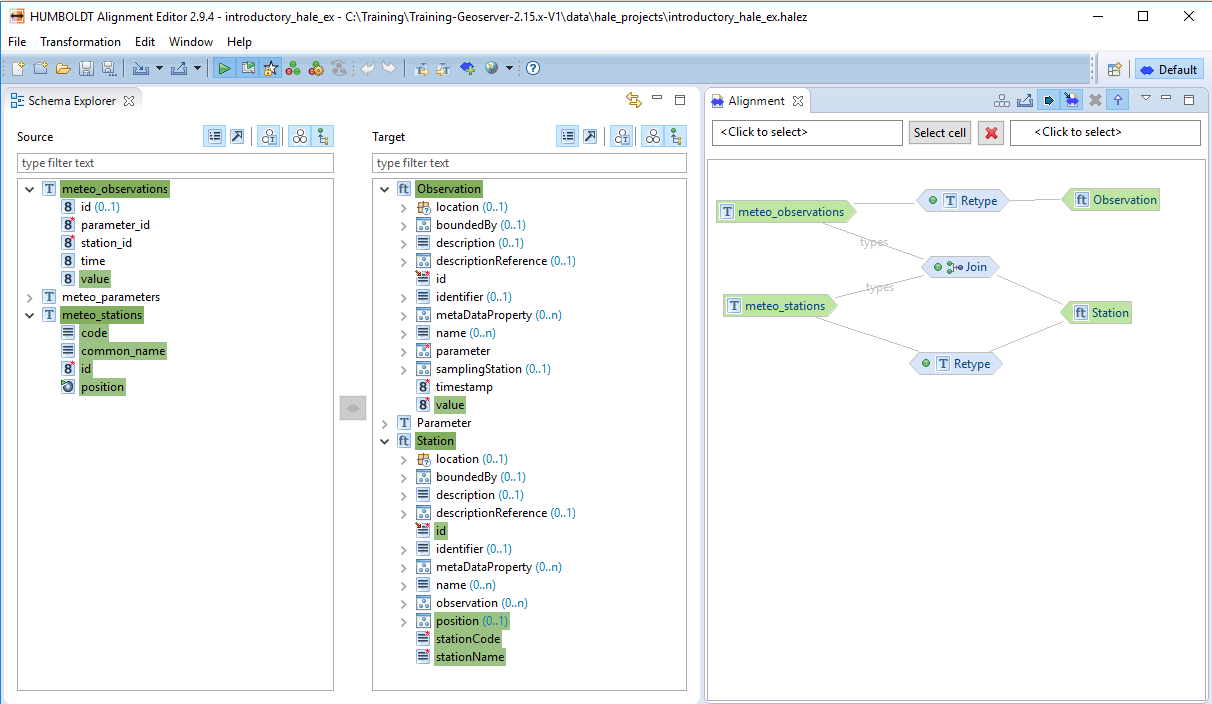
Defining the alignment
Once source and target schemas have been imported, it is time to define what HALE calls an alignment, i.e. a mapping between source and target schemas. An alignment defines relations between source and target entities (types or properties). First, relations between types must be established, and then relations between properties can be defined. Each relation is described by a function and it is visually represented in the alignment view by a mapping cell.
In the following example, the type t1 from the source schema is mapped to the type person in the target schema. The relation is represented by the Retype function

Creates a person instance for each t1 instance in the source data set
For more information on alignments, please read the relevant section in the HALE User Guide, accessible from the Help menu.
The meteorological database structure is depicted in the following E/R diagram:
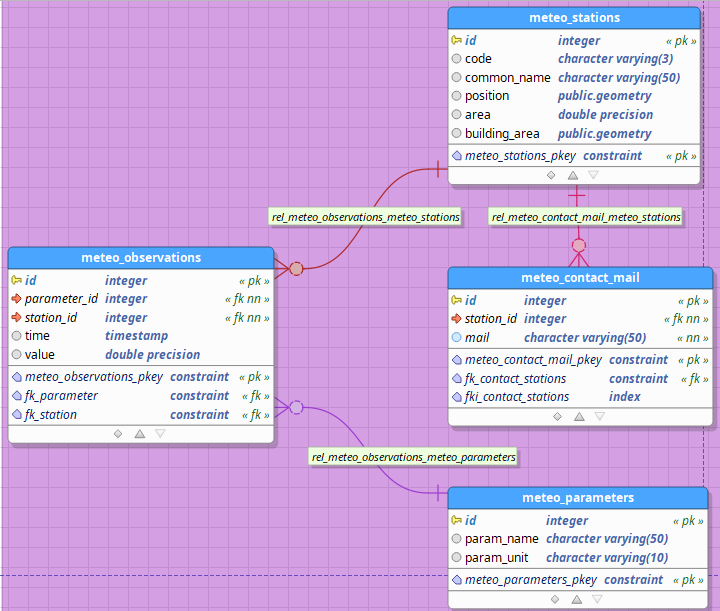
Three normalized tables are present:
- meteo_stations: holds basic information about the meteorological stations where measurements occur;
- meteo_observations: each record in this table stores the value of one environmental parameter (e.g. temperature, pressure, etc.) and the time instant when the sample was taken;
- meteo_parameters: holds the list of environmental parameters that can be measured by the stations.
A one-to-many relationship exists between meteo_stations and meteo_observations (a station may produce many observations); a many-to-one relationship exists between meteo_observations and meteo_parameters (many observations may refer to the same environmental parameter, sampled at different time instants).
We would like to define the mapping so that the resulting GML will have Station, Observation and Parameter elements properly nested inside each other: Station will contain related Observation instances in its multi-valued observation property, and Observation will contain the related Parameter instance in its single-valued parameter property.
Enabling the GeoServer compatibility mode
Before starting to define the mapping, it is wise to enable the GeoServer compatibility mode, by selecting Transformation → Compatibility mode → GeoServer from the menu. You should now see the word Geo next to a green tick mark icon at the corner of the status bar on the bottom:

GeoServer compatibility mode is on, no incompatibility detected
As long as the compatibility mode is enabled, HALE will notify the user if the mapping cannot be translated to an app-schema configuration (as shown in the figure below), due, for example, to the use of an unsupported transformation function.

GeoServer compatibility mode is on, incompatibility was detected
Mapping strategies
There can be different ways to define an alignment in HALE that would correctly translate to the desired App-Schema mapping configuration.
One possible approach is this:
- first, 1:1 relations between source types and their correspondent target type are established using the Retype function. In this example, the meteo_stations source type corresponds to the Station target type, so that for each record in the meteo_stations table, a Station feature should be created; the same applies to meteo_observations → Observation and meteo_parameters → Parameter;
- then, for each Retype relation, the properties of the source are mapped to the properties of the target;
- finally, the necessary Join relations between pairs of container ‐ nested types are introduced. In this example, the meteo_stations and meteo_observations source types need to be joined into the Station target type, so that each generated Station feature will contain its related Observation instances; the same applies to the meteo_observations and meteo_parameters source types, which will be joined into the Observation target type.
This approach has the advantage of mapping each type separately, thus resulting in simpler mapping cells. On the other hand, it produces a higher number of relations compared to other viable approaches. It also has the drawback that the transformed data as seen in HALE’s live preview (or exported to an external file) do not look as we expect; hence, this approach is valid only if all we want to do with the alignment is to export it to an App-Schema mapping configuration.
Another possible approach is the following:
- first, clusters of related source types forming separate, single-root object hierarchies are identified and a single Join relation between all source types and the target type corresponding to the root of the hierarchy is established. In this example, there is clearly a single object hierarchy, whose root is the Station type, so only one Join relation must be defined, combining the meteo_stations, meteo_observations and meteo_parameters source type into the Station target type;
- then, for each Join relation, the properties of the source types are mapped to the properties of the single target type, which contains the nested target types in its association properties. For example, the value property of the meteo_observations source type should be mapped to the st:observation/st:Observation/st:value property of the Station target type;
- finally, source type that are unrelated to any other type and thus are not part of any cluster are mapped using Retype relations, as outlined in the first approach.
This approach is clearly more complicated in the definition of each mapping cell, but generally requires fewer relations. Another advantage is that the transformed data will look the same in HALE and GeoServer, so HALE’s live preview can be used as an aid during the definition of the alignment.
Introductory HALE Mapping Exercise
During this introductory exercise we will complete an already half-done alignment of the meteo uses case using HALE.
Let’s start this exercise by importing the existing $TRAINING_ROOT\data\hale_projects\introductory_hale_ex.halez HALE project.
Import existing HALE project
Note
If you have not started it already, do so by double clicking on the hale.bat batch script (windows) or on the HALE link (linux) in the root folder of the training (i.e. the folder where the training package was extracted).
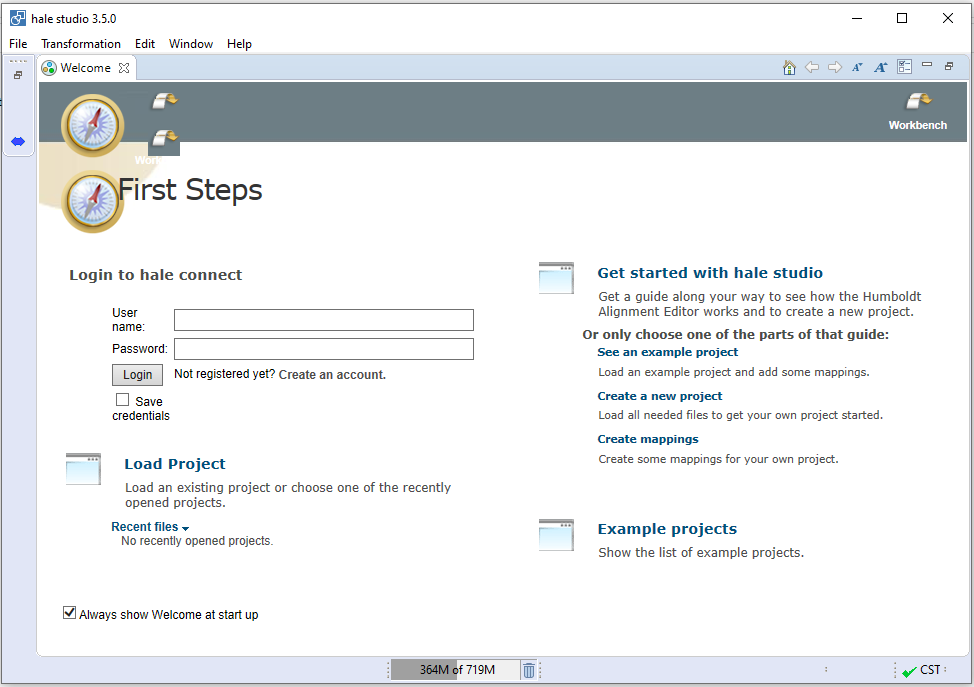
After startup, you should see a welcome screen like the following:
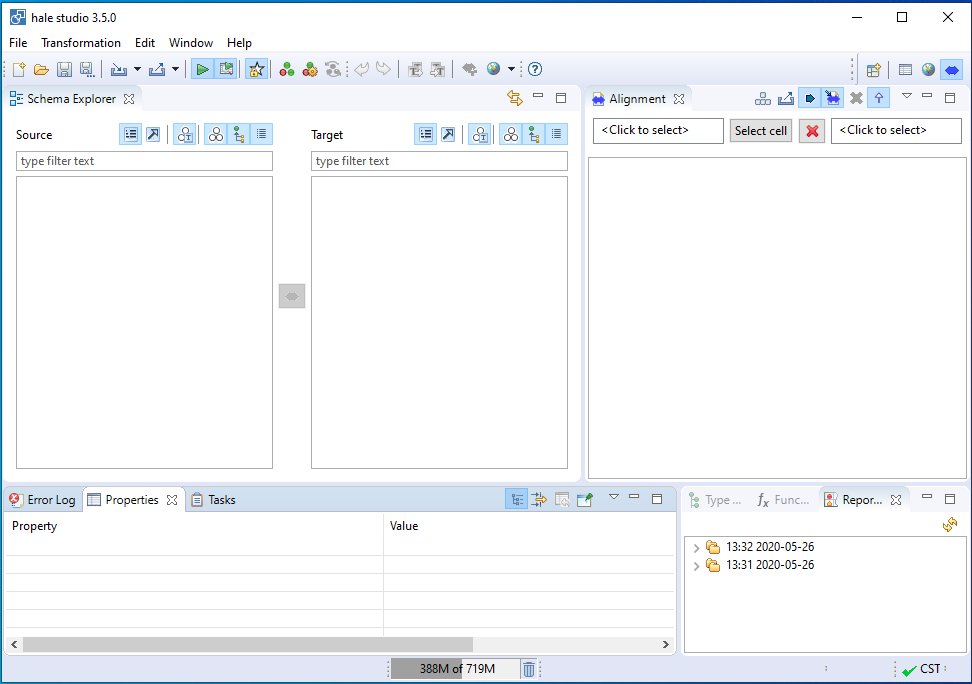
The Welcome tab can be safely closed by clicking on the cross next to the tab’s name, which will reveal HALE’s workbench:
An empty project is already open at this point, but if, for any reason, one would wish to start from scratch, all one needs to do is select File → New Alignment Project in the menu bar at the top of the workbench.
Warning
Before importing the existing HALE project make sure that the PostgreSQL database was started and that the first GeoServer instance is running.
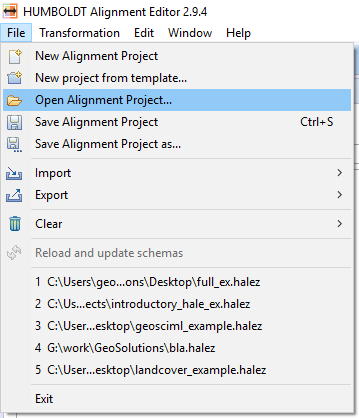
To import an existing project select File → Open Alignment Project in the menu bar at the top of the workbench:
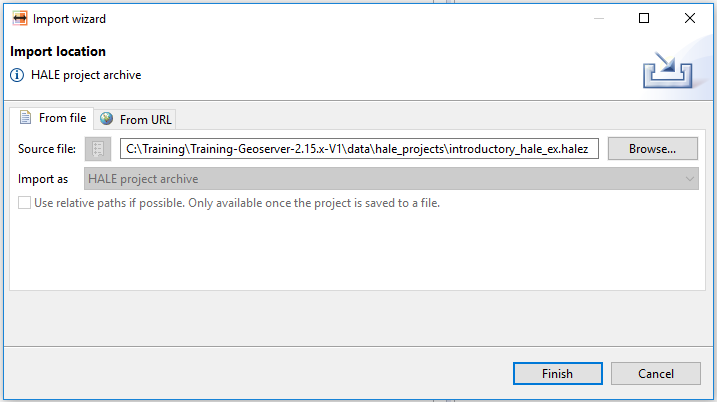
Then select or introduce the existing HALE project file path:
After the import is done, you should see a screen like the following:
As you can see the source and target schemas have already been imported and part of the alignments are already done.
Retyping meteo_parameters
Relations meteo_stations → Station and meteo_observations → Observation have already been defined:
We will now define the meteo_parameters → Parameter relation:
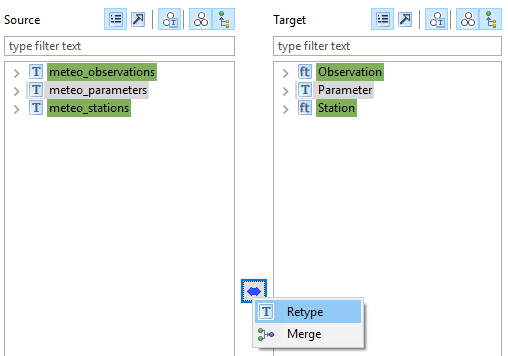
Select the meteo_parameters type in the Source section of the Schema Explorer view;
Select the Station type in the Target section of the Schema Explorer view;
Click on the blue double-pointing arrow icon in between the Source and Target sections of the Schema Explorer view and select Retype from the popup menu;
A wizard will open. Verify the first screen looks like the figure below, and click on the Next button:
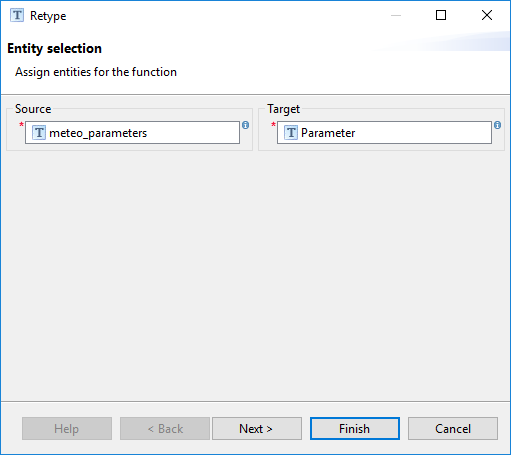
Click on the Finish button, the relationships between the root source types and target types are now defined:

Now that the type relations have been defined, it is time to configure the relations between source and target properties.
Mapping meteo_observations to Observation
The mappings between source and and target properties of relation meteo_stations → Station have already been done:
The mappings between source and and target properties of relation meteo_observations → Observation have already been partially done:
Let’s finish the mappings of relation meteo_observations and Observation:
Expand the list arrow of meteo_observations and Observation types. Select the meteo_observations/id attribute in the Source section of the Schema Explorer view, then Select the Observation/id attribute in the Target section of the Schema Explorer view:
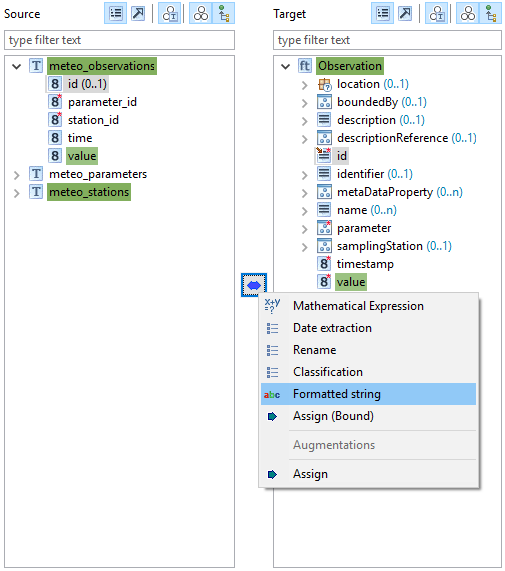
Click on the blue double-pointing arrow icon in between the Source and Target sections of the Schema Explorer view and select Formatted string from the popup menu.
A wizard will open. Click Next on the first screen and, on the second screen, define the format pattern by typing observation. and then double-clicking on id in the Available variables section, as shown in the figure below:
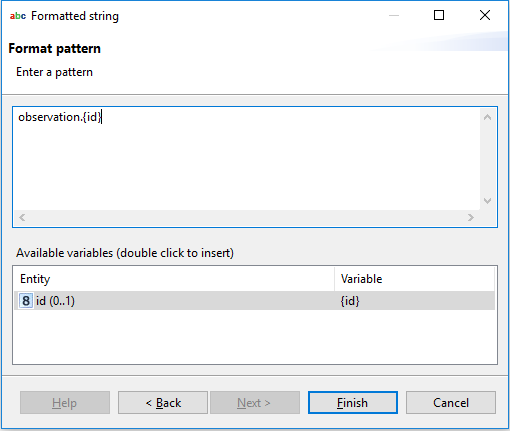
Click on the Finish button.
Select the meteo_observations/time attribute in the Source section of the Schema Explorer view then select the Observation/timestamp attribute in the Target section of the Schema Explorer view.
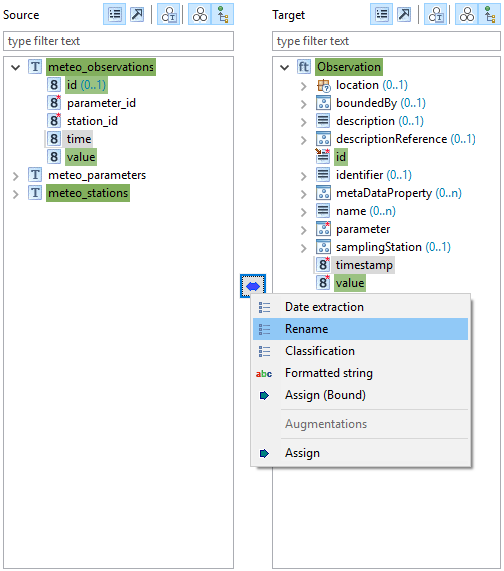
Click on the blue double-pointing arrow icon in between the Source and Target sections of the Schema Explorer view and select Rename from the popup menu.
A wizard will open:
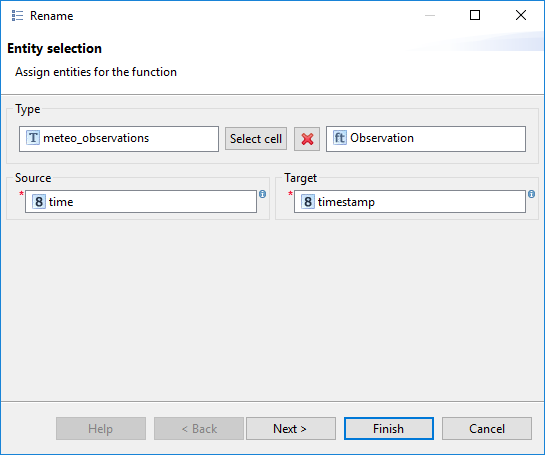
Click on the Finish button, the final alignment for the observations should be as the following:

Mapping meteo_parameters to Parameter
Remains mapping properties of meteo_parameters to properties of the Parameter target type.
Since the steps to follow are almost the same as those for the meteo_observations → Observation mapping, we will describe them more succintly.
- Map the meteo_parameters/id source property to the Parameter/id target property using the Formatted string transformation function. Use parameter.{id} as format pattern.
- Map the meteo_parameters/param_name source property to the Parameter/parameter target property using the Rename transformation function.
- Map the meteo_parameters/param_unit source property to the Parameter/unit target property using the Rename transformation function.
- The alignment should now look like the following:

The last step remaining to complete the alignment is to define the join relations existing in our model.
Joining meteo_observations and meteo_parameters
We already joined the meteo_stations and meteo_observations source types; the join target type must be the container type, in this case it was the Station type:
Let’s now join the meteo_observations and meteo_parameters source types; the container type in this case is the Observation type:
Select both meteo_observations and meteo_parameters types in the Source section of the Schema Explorer view by holding ctrl key.
Holding ctrl key, select the Observation type in the Target section of the Schema Explorer view, you can now release the ctrl key.
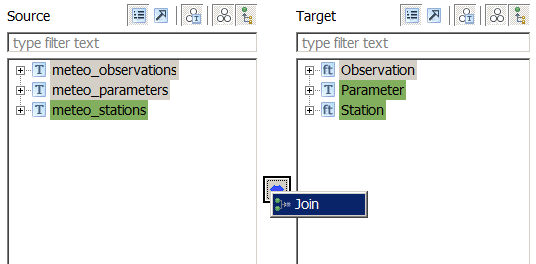
Click on the blue double-pointing arrow icon in between the Source and Target sections of the Schema Explorer view and select Join from the popup menu:
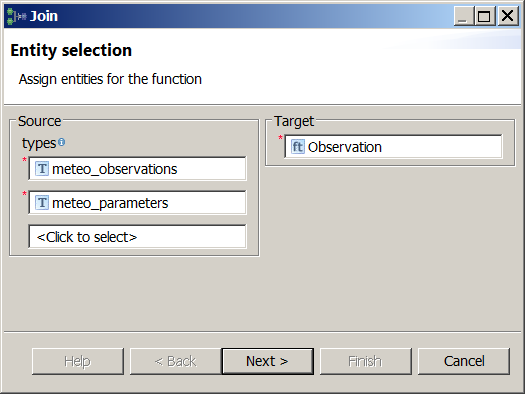
A wizard will open. Verify the first screen looks like the figure below, and click on the Next button:
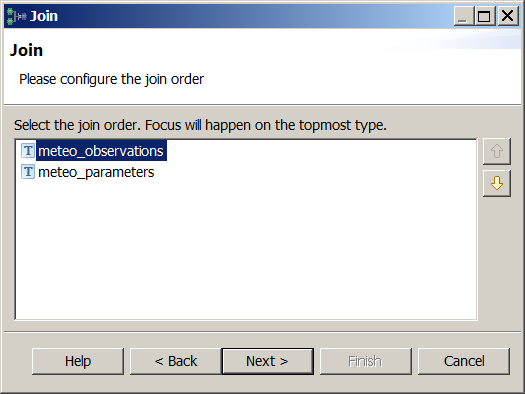
Configure the join order. The join order should follow the nesting order, i.e. the container (base) type should always precede the nested (join) type (see figure below).
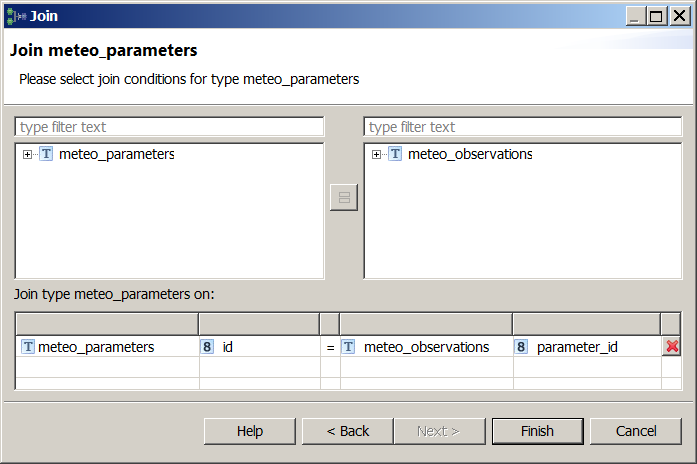
Define the join condition, specifying which columns contain equal values (i.e. define a foreign key constraint).
Click on the Finish button.
Make sure no cell is selected in the Alignment view by clicking on the red cross symbol

The Alignment view should now look like the following:
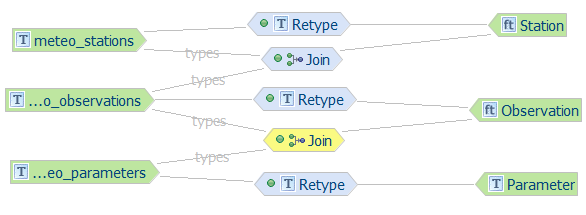
The alignment for this introductory exercise is done, you can find below the detailed steps necessary to perform, from scratch, the alignment we have just done.
Mapping each type separately
We will now demonstrate how the first approach works in practice. First, the meteo_stations → Station, meteo_observations → Observation and meteo_parameters → Parameter relations will be defined; then meteo_stations and meteo_observations will be joined into Station, and meteo_observations and meteo_parameters will be joined into Observation.
Retyping meteo_stations, meteo_observations and meteo_parameters
Select the meteo_stations type in the Source section of the Schema Explorer view
Select the Station type in the Target section of the Schema Explorer view
Click on the blue double-pointing arrow icon in between the Source and Target sections of the Schema Explorer view and select Retype from the popup menu
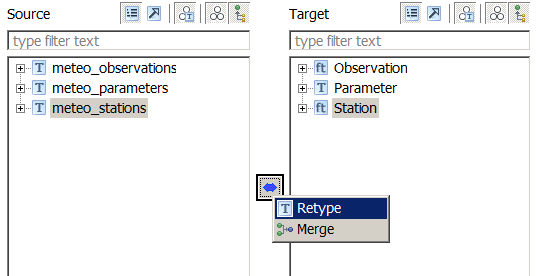
A wizard will open. Verify the first screen looks like the figure below, and click on the Next button:
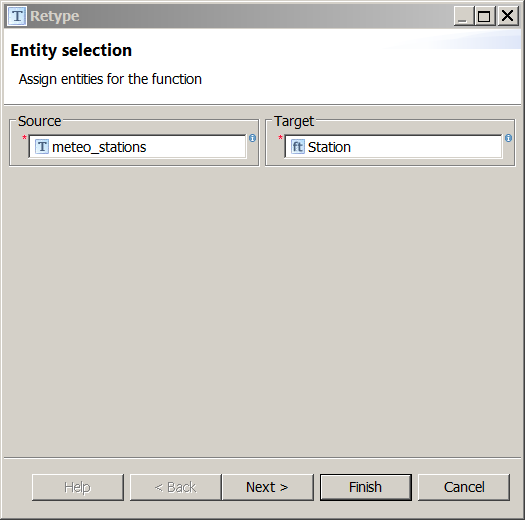
Click on the Finish button and the Alignment view should now look like the following:

The meteo_stations source type has been retyped to the Station target type
Repeat steps 1. through 5. for the meteo_observations type in the Source section of the Schema Explorer view and the Observation type in the Target section of the Schema Explorer view
Make sure no cell is selected in the Alignment view by clicking on the red cross symbol

The Alignment view should now look like the following:

Repeat steps 1. through 5. for the meteo_parameters type in the Source section of the Schema Explorer view and the Parameter type in the Target section of the Schema Explorer view
Make sure no cell is selected in the Alignment view by clicking on the red cross symbol

The Alignment view should now look like the following:

Now that the type relations have been defined, it is time to configure the relations between source and target properties.
Mapping meteo_stations to Station
The meteo_stations properties will be mapped to properties of the Station target type.
We will use the id source property to populate the gml:id target property, but, instead of using the value of the source property as is, we will prepend the string station. to it, using the Formatted String transformation function.
Select the meteo_stations/id property in the Source section of the Schema Explorer view
Select the Station/id property in the Target section of the Schema Explorer view
Click on the blue double-pointing arrow icon in between the Source and Target sections of the Schema Explorer view and select Formatted string from the popup menu
A wizard will open. Click Next on the first screen and, on the second screen, define the format pattern by typing station. and then double-clicking on id in the Available variables section, as shown in the figure below:
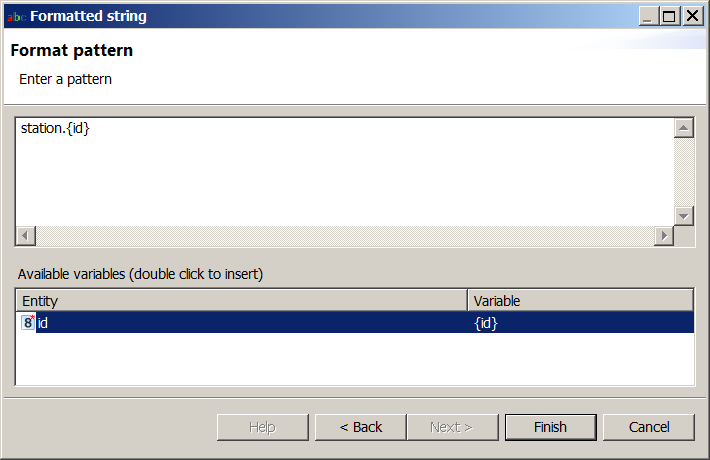
Click on the Finish button and the alignment should now look like the following:

Now we will map:
- the code source property to the stationCode target property
- the common_name source property to the stationName target property
- the position source property to the position target property
All the mappings will use the Rename transformation function, which simply copies source to target. Note that the geometry column in the source table (position) is directly mapped to a geometry property (of type gml:GeometryPropertyType) in the target feature type, no further configuration is necessary to properly encode the geometry in the output features.
Select the meteo_stations/code property in the Source section of the Schema Explorer view
Select the Station/stationCode property in the Target section of the Schema Explorer view
Click on the blue double-pointing arrow icon in between the Source and Target sections of the Schema Explorer view and select Rename from the popup menu
A wizard will open:
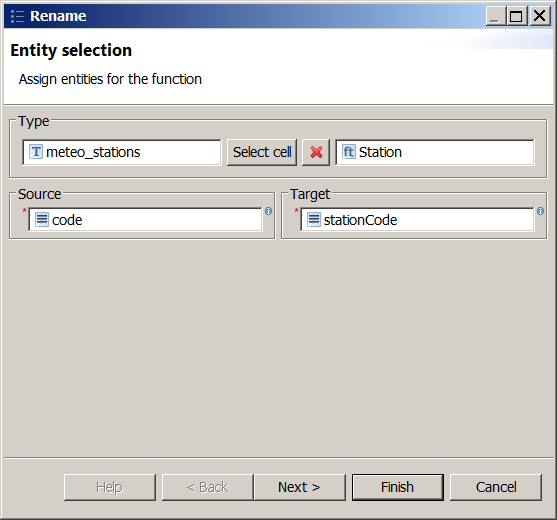
Click on the Finish button and the alignment should now look like the following:

Select the meteo_stations/common_name property in the Source section of the Schema Explorer view
Select the Station/stationName property in the Target section of the Schema Explorer view
Click on the blue double-pointing arrow icon in between the Source and Target sections of the Schema Explorer view and select Rename from the popup menu
A wizard will open:
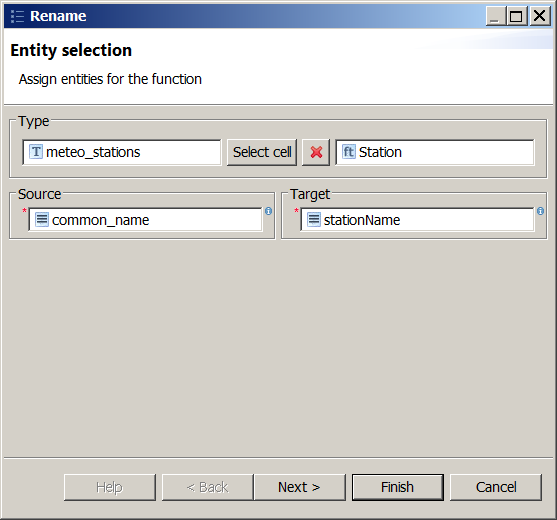
Click on the Finish button and the alignment should now look like the following:

Select the meteo_stations/position property in the Source section of the Schema Explorer view
Select the Station/position property in the Target section of the Schema Explorer view
Click on the blue double-pointing arrow icon in between the Source and Target sections of the Schema Explorer view and select Rename from the popup menu
A wizard will open:
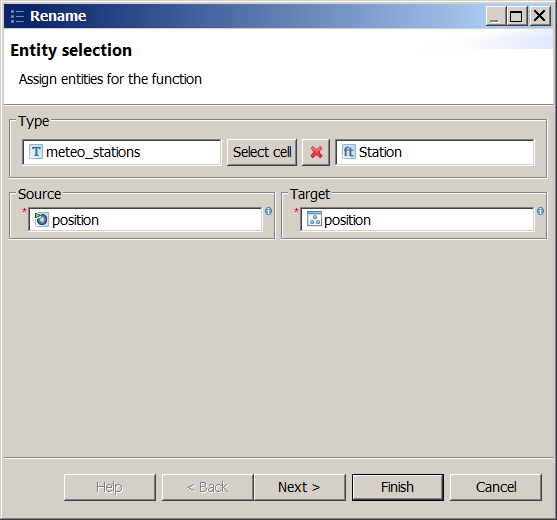
Click on the Finish button and the alignment should now look like the following:

Mapping meteo_observations to Observation
The meteo_observations properties will be mapped to properties of the Observation target type.
Since the steps to follow are exactly the same as those for the meteo_stations → Station mapping, we will describe them more succintly.
- Map the meteo_observations/id source property to the Observation/id target property using the Formatted string transformation function. Use observation.{id} as format pattern.
- Map the meteo_observations/time source property to the Observation/timestamp target property using the Rename transformation function.
- Map the meteo_observations/value source property to the Observation/value target property using the Rename transformation function.
- The alignment should now look like the following:

Mapping meteo_parameters to Parameter
The meteo_parameters properties will be mapped to properties of the Parameter target type.
Since the steps to follow are exactly the same as those for the meteo_stations → Station mapping, we will describe them more succintly.
- Map the meteo_parameters/id source property to the Parameter/id target property using the Formatted string transformation function. Use parameter.{id} as format pattern.
- Map the meteo_parameters/param_name source property to the Parameter/parameter target property using the Rename transformation function.
- Map the meteo_parameters/param_unit source property to the Parameter/unit target property using the Rename transformation function.
- The alignment should now look like the following:

Mapping table overview
The following table summarizes the defined mappings:
| source property | target property | type of mapping |
|---|---|---|
| meteo_stations/id | Station/id | Formatted string (station.{id}) |
| meteo_stations/code | Station/stationCode | Rename |
| meteo_stations/common_name | Station/stationName | Rename |
| meteo_stations/position | Station/position | Rename |
| meteo_observations/id | Observation/id | Formatted string (observation.{id}) |
| meteo_observations/time | Observation/timestamp | Rename |
| meteo_observations/value | Observation/value | Rename |
| meteo_parameters/id | Parameter/id | Formatted string (parameter.{id}) |
| meteo_parameters/param_name | Parameter/parameter | Rename |
| meteo_parameters/param_unit | Parameter/unit | Rename |
Joining meteo_stations and meteo_observations
It is now time to define the two Join relations existing in our model. We will begin by joining the meteo_stations and meteo_observations source types; the Join target type must be the container type, so in this case it is the Station type.
Select the meteo_stations and meteo_observations types in the Source section of the Schema Explorer view
Select the Station type in the Target section of the Schema Explorer view
Click on the blue double-pointing arrow icon in between the Source and Target sections of the Schema Explorer view and select Join from the popup menu
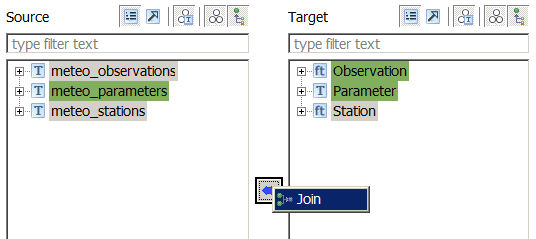
A wizard will open. Verify the first screen looks like the figure below, and click on the Next button:
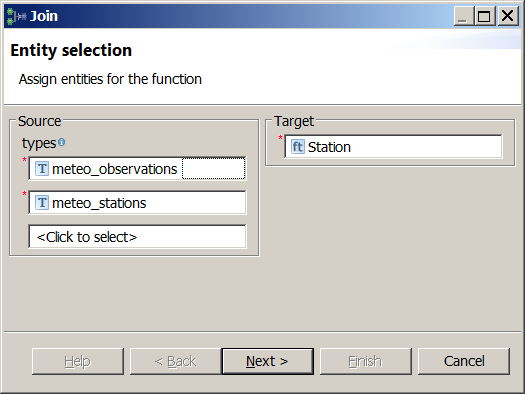
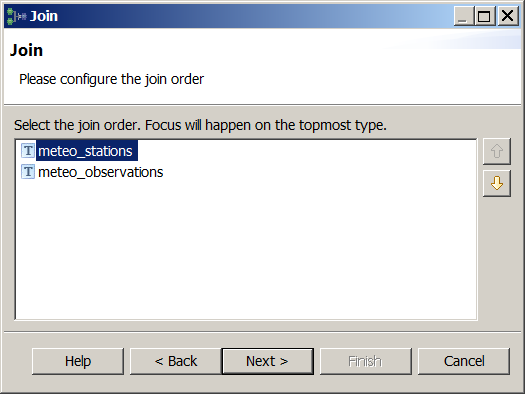
Configure the join order. The join order should follow the nesting order, i.e. the container (base) type should always precede the nested (join) type (see figure below).
Define the join condition, specifying which coloumns contain equal values (i.e. define a foreing key constraint).
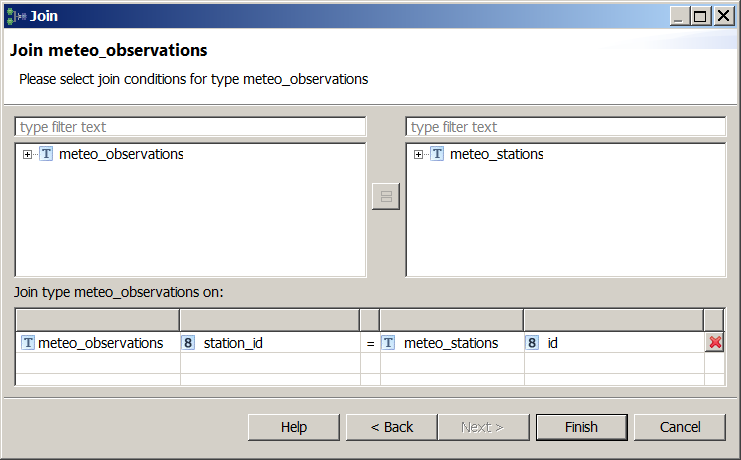
Join condition between meteo_stations (base type) and meteo_observations (join type)
Note
In HALE, multiple join conditions can be specified for each source type, whereas the GeoServer App-Schema extension only supports single-condition joins; thus, in order to be translatable to a GeoServer App-Schema configuration, an alignment should not contain more than one join condition for the same source type.
Click on the Finish button.
Make sure no cell is selected in the Alignment view by clicking on the red cross symbol

The Alignment view should now look like the following:

Join mapping is now complete
Joining meteo_observations and meteo_parameters
We will now join the meteo_observations and meteo_parameters source types; as noted previously, the Join target type must be the container type, so in this case it is the Observation type.
Select the meteo_observations and meteo_parameters types in the Source section of the Schema Explorer view
Select the Observation type in the Target section of the Schema Explorer view
Click on the blue double-pointing arrow icon in between the Source and Target sections of the Schema Explorer view and select Join from the popup menu

A wizard will open. Verify the first screen looks like the figure below, and click on the Next button:

Configure the join order. The join order should follow the nesting order, i.e. the container (base) type should always precede the nested (join) type (see figure below).

Define the join condition, specifying which columns contain equal values (i.e. define a foreign key constraint).

Join condition between meteo_observations (base type) and meteo_parameters (join type)
Click on the Finish button.
Make sure no cell is selected in the Alignment view by clicking on the red cross symbol

The Alignment view should now look like the following:

Join mapping is now complete
Mapping 1..n cardinality
Mapping 1..n cardinality (also known as JDBC multi-value attributes) is an App-Schema functionality that allows to generate several child simple properties on a feature, getting the data from a database relationship (a join). On the Schema Stationtype definition we have a multi(unbounded) simple property named contactMail:
<complexType name="StationType">
  <complexContent>
    <extension base="gml:AbstractFeatureType">
      <sequence>
        <element name="stationCode" minOccurs="1" maxOccurs="1"
                 type="string" />
        <element name="stationName" minOccurs="1" maxOccurs="1"
                 type="string" />
        <element name="observation" minOccurs="0" maxOccurs="unbounded"
                 type="st:ObservationPropertyType" />
        <element name="contactMail" minOccurs="0" maxOccurs="unbounded"
                 type="string"/>
        <element name="position" type="gml:GeometryPropertyType"
                 minOccurs="0" maxOccurs="1" />
        <element name="buildingSite" minOccurs="0" maxOccurs="1"
                 type="st:BuildingSitePropertyType" />
      </sequence>
    </extension>
  </complexContent>
</complexType>
The desired output for this st:contactMail multi simple property is:
<st:Station gml:id="station.7">
<st:stationCode>BOL</st:stationCode>
<st:stationName>Bologna</st:stationName>
<st:observation>
  (...)
</st:observation>
<st:contactMail>station1@stations1.org</st:contactMail>
<st:contactMail>info@station1.org</st:contactMail>
<st:position>
  <gml:Point srsName="http://www.opengis.net/gml/srs/epsg.xml#404000">
    <gml:pos>11.34 44.5</gml:pos>
  </gml:Point>
</st:position>
</st:Station>
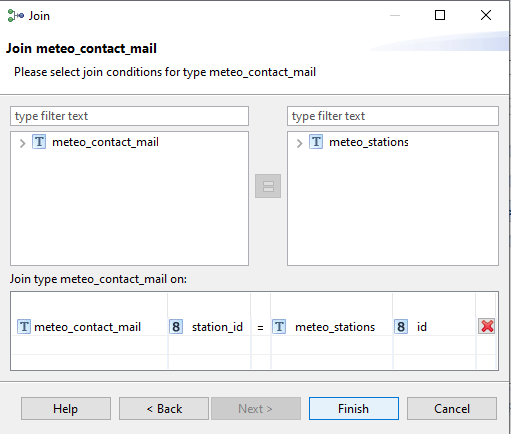
The required data for the st:contactMail property is located on the meteo_contact_mail database table → mail field. The station_id field on meteo_contact_mail table joins to meteo_stations table by its id primary key fied (see the database ER diagram).
On the following steps we will setup the cardinality 1..n simple attribute using this database relathionship, specifically we will connect Station/contactMail type multiple attributes to meteo_contact_mail.mail table field, and join meteo_stations with meteo_contact_mail database tables with one-to-many relathionship.
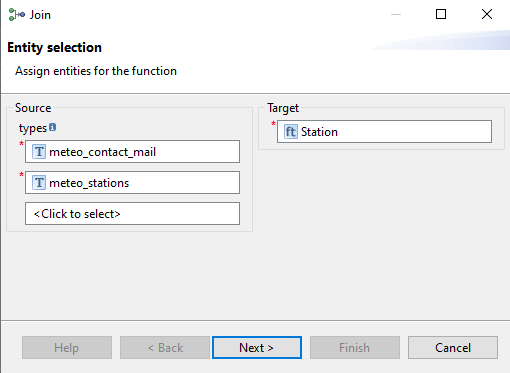
Select meteo_contact_mail and meteo_stations on Source.
Select Station on Target.
Click the linking button and select Join.
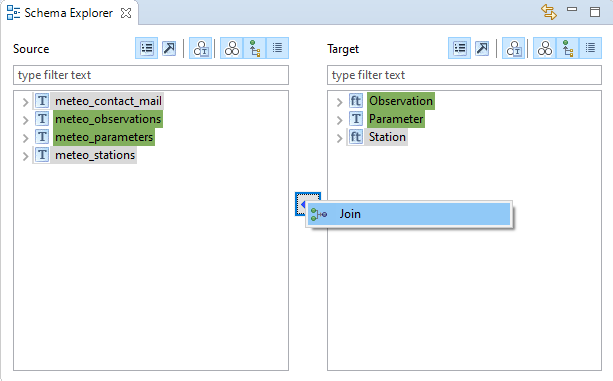
Click Next button on the Join wizard window.
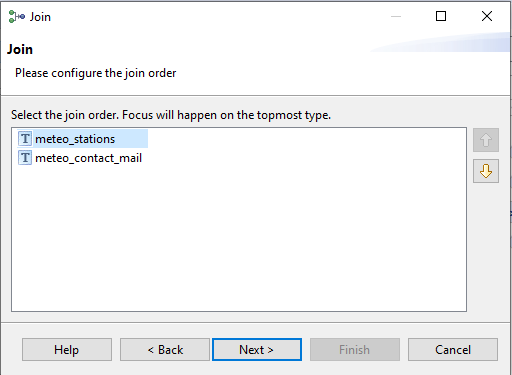
Put meteo_stations first on the join order step and click Next.
Click Finish.
Now lets link the attributes.
On Source, select mail attribute on meteo_contact_mail table.
On Target, select contactMail attribute on Station type.
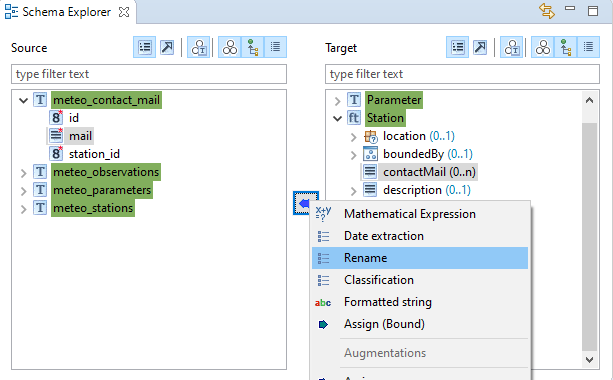
Click on Finish button.
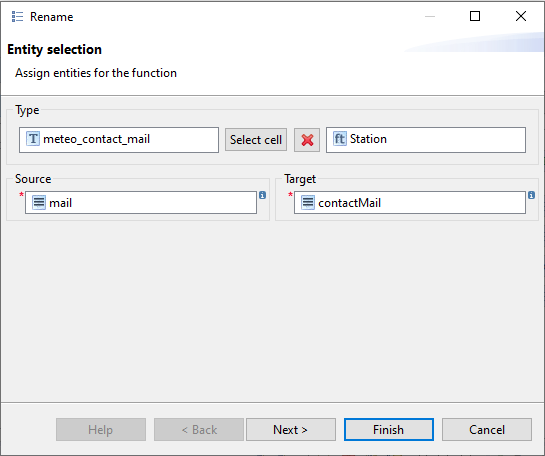
Congratulations, the mapping is now complete. You can jump to the next section to learn how your alignment can be exported to an App-Schema mapping configuration and uploaded to GeoServer. Otherwise, read on to explore an alternative mapping strategy, based on a single Join relation.
Single-join mapping
We will now demonstrate how the second approach works in practice. First, the three source tables, meteo_stations, meteo_observations and meteo_parameters are combined and mapped to the Station type, using a single Join relation; then, the properties of the source types are mapped to the properties of the target type and of the types nested in it.
Joining meteo_stations, meteo_observations and meteo_parameters
Select the meteo_stations, meteo_observations and meteo_parameters types in the Source section of the Schema Explorer view
Select the Station type in the Target section of the Schema Explorer view
Click on the blue double-pointing arrow icon in between the Source and Target sections of the Schema Explorer view and select Join from the popup menu
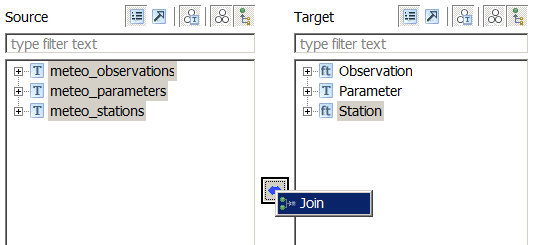
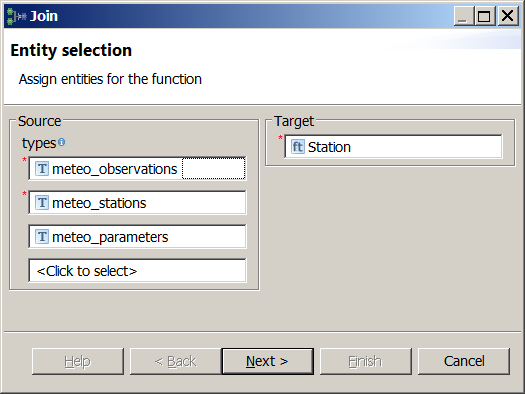
A wizard will open. Verify the first screen looks like the figure below, and click on the Next button:
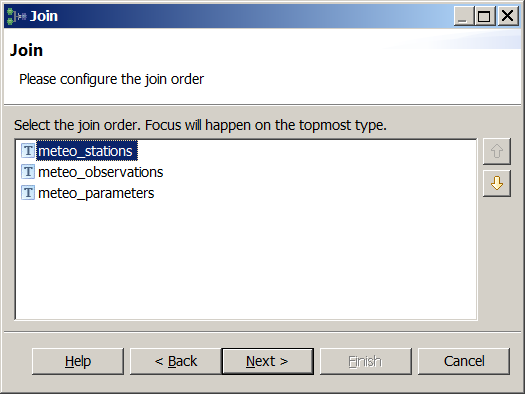
Configure the join order. The join order should follow the nesting order, i.e. the container (base) type should always precede the nested (join) type (see figure below).
For each pair of tables to join, define the join conditions, specifying which columns contain equal values (i.e. define a foreign key constraint).

Join condition between meteo_stations (base type) and meteo_observations (join type)
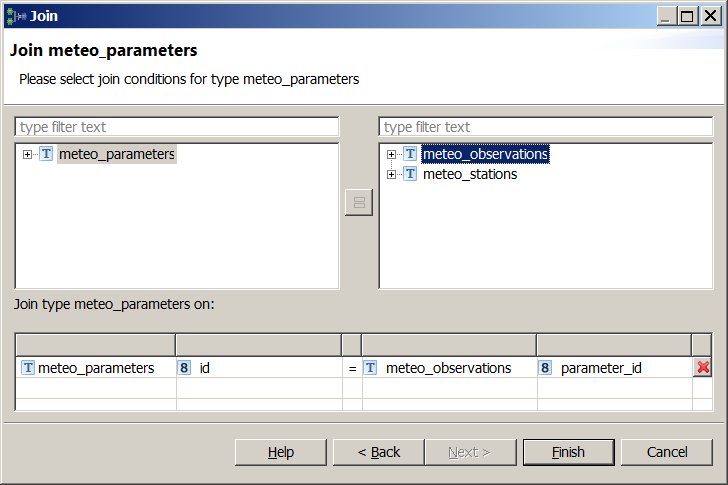
Join condition between meteo_observations (base type) and meteo_parameters (join type)
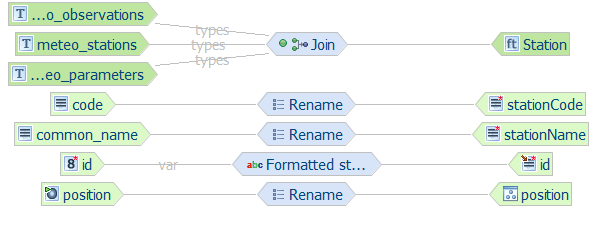
Click on the Finish button and the Alignment view should now look like the following:

Join mapping is now complete
Now that the type relations have been defined, it is time to configure the relations between source and target properties.
Mapping meteo_stations to Station
The meteo_observations properties will be mapped to properties of the Observation target type.
The steps to follow are exactly the same as those described in the first approach, so we will not repeat them here.
In the end, the alignment should look like the following:
Mapping meteo_observations to Observation
The meteo_observations properties will be mapped to properties of the Observation target type. Be careful, though, because we will not pick the properties of the top level Observation type (which is immediately visible in the Target section of the Schema Explorer view), but we will reach for the Observation type nested under the observation property of the Station type (see figure below), and map to its child properties.
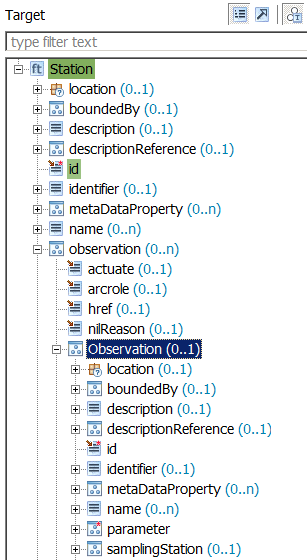
We want to map to the child properties of the Observation type nested in the Station type
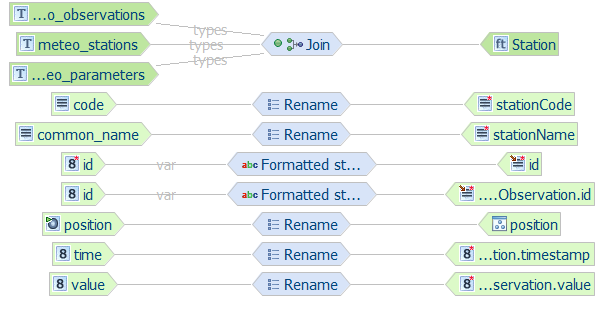
Here is a brief summary of the actions that should be taken:
- Map the meteo_observations/id source property to the Station/observation/Observation/id target property using the Formatted string transformation function. Use observation.{id} as format pattern.
- Map the meteo_observations/time source property to the Station/observation/Observation/timestamp target property using the Rename transformation function.
- Map the meteo_observations/value source property to the Station/observation/Observation/value target property using the Rename transformation function.
- The alignment should now look like the following:
Mapping meteo_parameters to Parameter
The meteo_parameters properties will be mapped to properties of the Parameter target type. Again, be careful, because we will not pick the properties of the top level Parameter type (which is immediately visible in the Target section of the Schema Explorer view), but we will reach for the Parameter type nested under the parameter property of the Observation type, which is itself nested under the observation property of the Station type (see figure below), and map to its child properties.
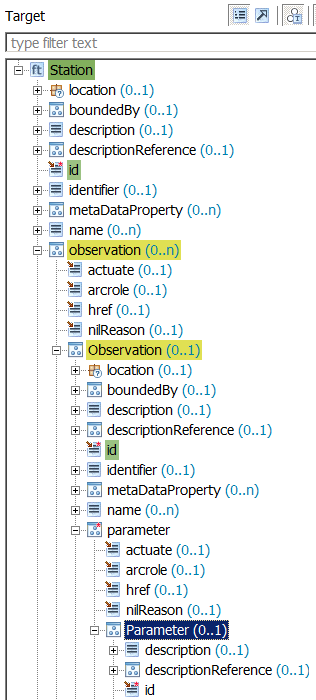
We want to map to the child properties of the Parameter type nested in the Station type
Here is a brief summary of the actions that should be taken:
- Map the meteo_parameters/id source property to the Station/observation/Observation/parameter/Parameter/id target property using the Formatted string transformation function. Use parameter.{id} as format pattern.
- Map the meteo_parameters/param_name source property to the Station/observation/Observation/parameter/Parameter/parameter target property using the Rename transformation function.
- Map the meteo_parameters/param_unit source property to the Station/observation/Observation/parameter/Parameter/unit target property using the Rename transformation function.
- The alignment should now look like the following:
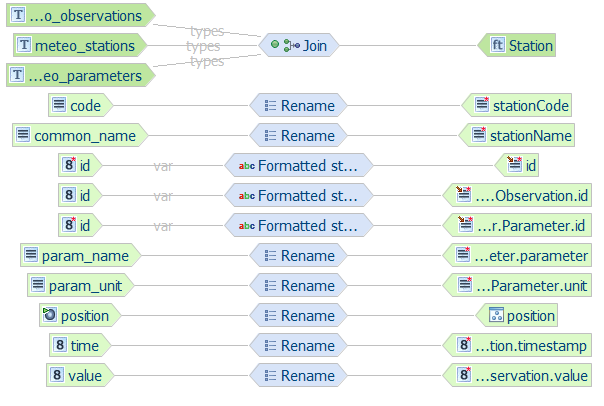
Mapping table overview
The following table summarizes the defined mappings:
| source property | target property | type of mapping |
|---|---|---|
| meteo_stations/id | Station/id | Formatted string (station.{id}) |
| meteo_stations/code | Station/stationCode | Rename |
| meteo_stations/common_name | Station/stationName | Rename |
| meteo_stations/position | Station/position | Rename |
| meteo_observations/id | Station/observation/Observation/id | Formatted string (observation.{id}) |
| meteo_observations/time | Station/observation/Observation/timestamp | Rename |
| meteo_observations/value | Station/observation/Observation/value | Rename |
| meteo_parameters/id | Station/observation/Observation/parameter/Parameter/id | Formatted string (parameter.{id}) |
| meteo_parameters/param_name | Station/observation/Observation/parameter/Parameter/parameter | Rename |
| meteo_parameters/param_unit | Station/observation/Observation/parameter/Parameter/unit | Rename |
Congratulations, the mapping is now complete. You can jump to the next section to learn how your alignment can be exported to an App-Schema mapping configuration and uploaded to GeoServer. Otherwise, if you would like to practice a little bit more on your own to consolidate your understanding of the material, read on and try to complete the following bonus exercise.
Bonus exercise
To test your newly acquired skills, you could try to create a new alignment where the nesting order of the Station and Observation types is inverted: each Observation feature should contain the related Station feature nested in its samplingStation property. You can follow either one of the two approaches described above to accomplish the task.

