
Configuring GeoServer
The alignment has now been defined and can be exported to a GeoServer App-Schema configuration, thanks to the App-Schema plugin for HALE developed by GeoSolutions.
To start the Export Alignment wizard, select File → Export → Alignment... from the menu bar on top.
The export procedure is mostly the same regardless of the alignment in question, so we will go through it only for the mapping based on normalized tables.
Choosing an export format
The first step consists in choosing the export format. The wizard screen should look like this:
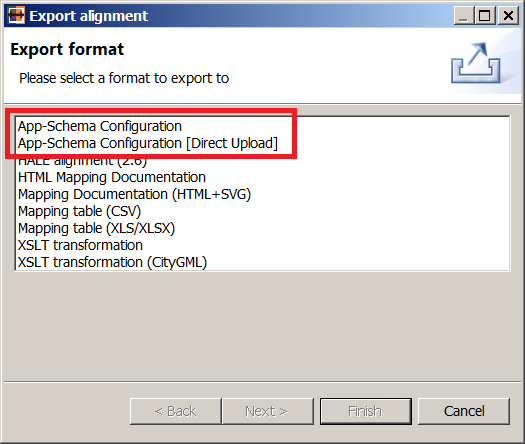
Export format dialog
The highlighted options in the figure above represent two complementary export approaches:
- App-Schema Configuration: the configuration is saved to one or more files, which must be manually copied / extracted to the right place in the GeoServer data directory. This approach may be preferred during testing, or when a live GeoServer instance is not available or not accessible.
- App-Schema Configuration [Direct Upload]: the configuration is generated and immediately uploaded to GeoServer via its REST API. This approach is more convenient and should generally be preferred.
In the context of this tutorial, we will always do direct uploads, so select the second option (App-Schema Configuration [Direct Upload]) in the list and click on the Next button. Another dialog will appear, asking for the URL of the GeoServer instance we want to publish to:
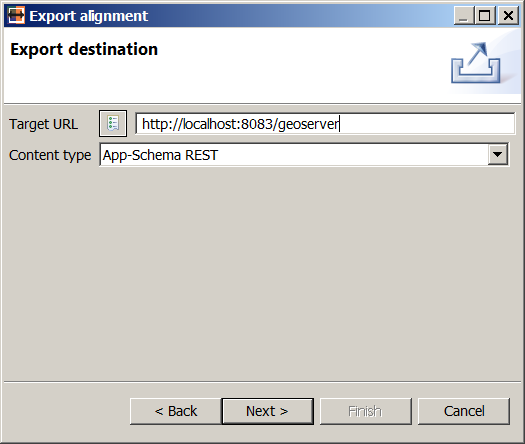
Enter http://localhost:8083/geoserver in the Target URL field and hit Next.
Including target schema
The next wizard screen is very simple, as it poses a simple question:
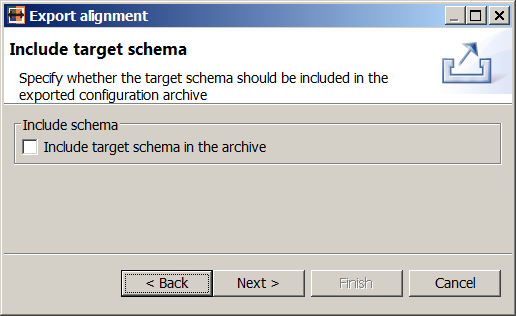
If the Include target schema in the archive option is checked, the target schema that was imported in the project at the beginning of the example, including all its dependencies, will be added to the exported archive and uploaded to GeoServer along with the mapping configuration.
This option may be useful when GeoServer is running on a server with no internet connectivity and is thus unable to download the required schemas from the web. However, in general it should be left unchecked, to maximize schema reuse among App-Schema datastores via GeoServer’s centralized App-Schema cache.
Leave the option unchecked, and click Next.
Configuring feature chaining
If the alignment defines at least one Join relation, the wizard will now ask us to configure feature chaining. Basically, we will provide here the missing configuration bits, that could not be specified in the Join definition and that are actually needed by GeoServer to properly nest the joined types. Even if the Join involved more than two types, feature chaining is always configured pair-wise.
We will be presented with one configuration dialog for each join condition that we defined. The first dialog is shown in the figure below:
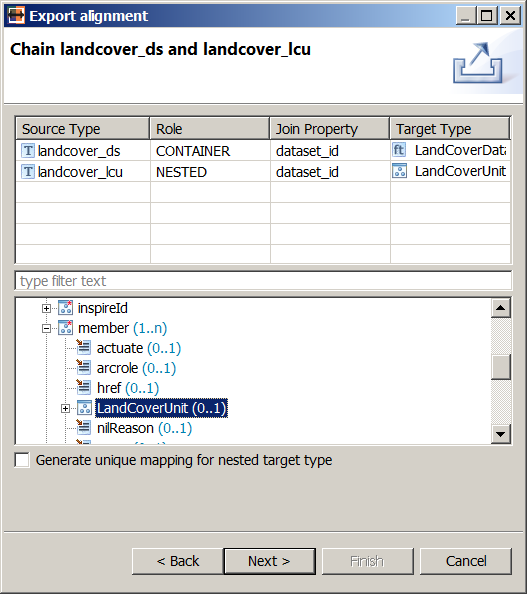
Feature chaining configuration for landcover_ds and landcover_lcu
The upper part of the dialog contains a read-only table displaying the current configuration, while the bottom part contains a schema explorer view, showing all the properties of the target type of the whole Join relation, and, further down, a checkbox.
We will forget about the checkbox for now, as it is not relevant for this example, and focus on the table and the schema explorer view.
The table is composed of four columns:
- Source Type: the name of the source type we are chaining / joining.
- Role: specifies whether the source type should be nested into the other, or viceversa. The role is determined from the join order and cannot be modified: the join type in the condition has always the NESTED role, while the base type has always the CONTAINER role.
- Join Property: the property that is checked for equality.
- Target Type: the source type will be mapped to this type, i.e. a feature type mapping for it will be created in the App-Schema configuration.
As the dialog is opened the first time, all cells in the table are filled automatically, except the nested type’s target: that is what we will select in the schema explorer view. Navigate to the LandCoverDataset/member/LandCoverUnit property and click on it: the Target Type column in the second table row will be populated with the value LandCoverUnit, as shown in the figure above. In this way, we are telling GeoServer both that the landcover_lcu source type should be mapped to the LandCoverUnit type and that LandCoverUnit instances should be nested under the member attribute of the LandCoverDataset type.
Leave the Generate unique mapping for nested target type checkbox unchecked, and hit Next.
The second feature chaining configuration dialog will appear. Select the LandCoverDataset/member/LandCoverUnit/landCoverObservation/LandCoverObservation property in the schema explorer view and the dialog should now look like the figure below:
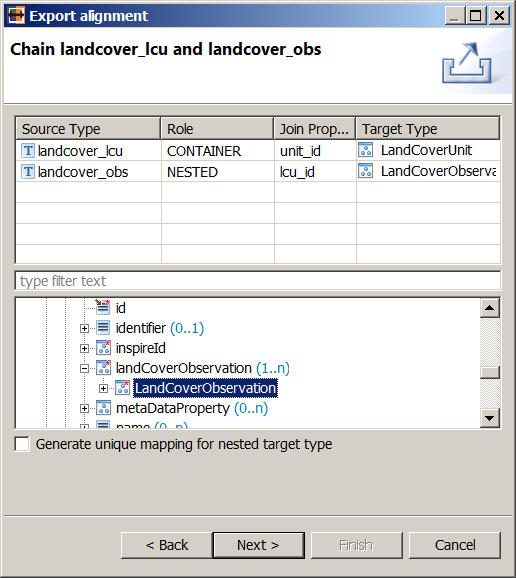
Feature chaining configuration for landcover_lcu and landcover_obs
In this way, we are telling GeoServer both that the landcover_obs source type should be mapped to the LandCoverObservation type, and that LandCoverObservation instances should be nested under the landCoverObservation attribute of the LandCoverUnit type.
Again, leave the Generate unique mapping for nested target type checkbox unchecked, and hit Next to proceed to the DataStore configuration screen.
Configuring the DataStore
On this wizard page, you must enter the DataStore configuration parameters.
Note
Although the GeoServer App-Schema extension supports a variety of data store types and multiple data store configurations, the HALE App-Schema plugin only allows to configure a single PostGIS data store. This limitation will likely be removed (or at least alleviated) in future releases of the plugin.
Select the database type, on this case Relational Database:
Fill the database connection fields:
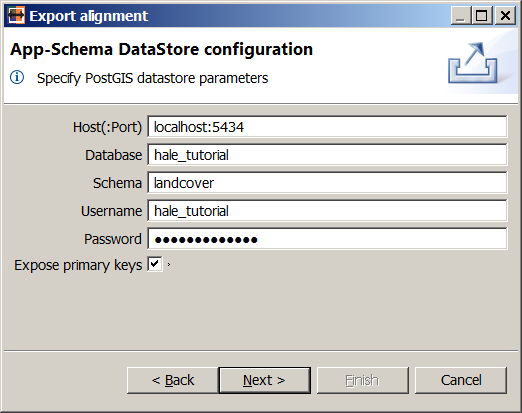
The database password is hale_tutorial. Be sure to check Expose primary keys, or you will get errors where primary key columns are used in attribute mappings.
Clicking on the Next button will take you to the last page in the wizard.
Providing REST credentials
The last wizard page asks you to enter the credentials to access GeoServer’s REST services (see figure below).
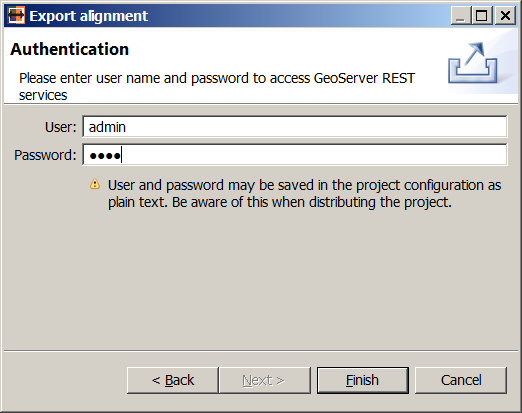
Username and password for the local GeoServer instance are respectively admin and Geos.
Click on the Finish button to generate the configuration and upload it to the local GeoServer instance.
Note
Before starting the upload, make sure GeoServer is actually running by visiting the URL http://localhost:8083/geoserver. If it’s not running start it by double clicking on the start_geoserver.bat batch script.
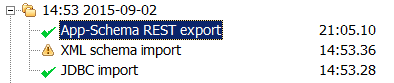
If all goes well, when the upload is finished you should see in the Report List view an App Schema REST export message with a green tick mark icon on its left side.
Visit GeoServer’s Layer Preview page and you should see two new layers in the list, lcv:LandCoverDataset and lcv:LandCoverUnit.

Congratulations, you successfully created a new App-Schema DataStore in GeoServer! In the next section, we will issue a few WFS requests to demonstrate how your data can be queried.